Have you ever seen photos of people holding the Eiffel Tower as if it was a small toy? This effect is possible when using a forced perspective technique. Basically, it is an optical illusion that manipulates the way we see things. Forced perspective allows you to create an appearance that the object is larger or smaller, and farther away or closer than it really is.
The first images that come to mind are funny and apparently impossible shots. Such as holding the Eiffel Tower or pushing the Tower of Pisa. But, forced perspective offers a lot more than just crazy, funny photos. Actually, forced perspective has been used since ancient times to create a perfect impression or to enhance it. Of course, I am not talking about photography. Forced perspective was and is used in architecture and filmmaking as well. Just think of Hobbits in The Lord of the Rings or Rubeus Hagrid in the Harry Potter movies. Yes, Hagrid is a giant and Hobbits are small thanks to forced perspective in most of the scenes in these movies.
Back to photography, forced perspective allows you to accentuate the subject and tell an unusual story. The idea is similar to distortion effects: you can use it to create unique images and offer an unusual point of view. Of course, you can do it just for fun as well. Forced perspective allows you to capture really hilarious, and mind-boggling images. However, there are some rules you need to follow. Otherwise, your images won’t look funny, but ridiculous.
“You don’t take a photograph, you make it.”
– Ansel Adams
Make a Plan
Forced perspective images aren’t technically difficult. They are more about fitting everything together in a proper way. So, you need to plan it carefully. Planning is essential in photography. Even for the most candid shots, you need to prepare and make a plan to be able to react and catch that perfect glimpse.
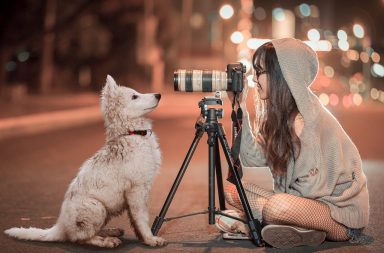
As for forced perspective photos, it all begins with a location. Technically, you can create a forced perspective image almost anywhere. But, you should look for places where you can avoid distractions. Remember, you are creating an illusion, so distractions can ruin it. For example, if unintended people enter the frame, their position can ruin your game. You should try to use all visual elements in your frame to create a convincing image. Or to avoid the elements that create a distraction. So, you can see how important it is to plan ahead. If you are shooting a tourist attraction, choose early morning before it gets too crowded. Investigate your location to find the view that will work for you.
Try Different Ideas
Experimenting leads to improvement. That’s a general rule in life as well, but don’t overdo it. While planning is necessary, making smaller or greater changes to your plan can lead you to capture the most amazing shots. This is actually the core of my approach to photography. You need to learn the rules, you need to master techniques, and you need to plan carefully. These basics will allow you to experiment, change the plan, and break the rules to achieve the best results.
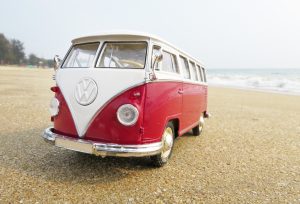
This toy car looks like a real car because of forced perspective
In this case, you can change your subject’s position. Search for the best composition. Actually, the composition is the key to create a perfect forced perspective image, but I’ll come back to it a little bit later. Change the angles. The perfect angle can do a miracle for a forced perspective image. Most often you will want to merge your foreground and the background. To do so, shoot from the ground level.
Composition
As I said, the composition is crucial to a forced perspective. Once again, you should think about it beforehand. You don’t really need to work it all out. But, a general idea about the composition is a good starting point.
You need to keep two things in your mind. First, you need a composition that will create an illusion. It means you should align your foreground and the background, and place your subject properly. It also includes looking for the best angles and fitting everything together. Basically, you are making an arrangement so that your image looks convincing and interesting.
At the same time, you need to keep your image balanced. To achieve this you need to use regular rules of composition. Use the rule of thirds, leading lines, diagonals, and framing to keep the balance in the image. Otherwise, you will get a peculiar image, but not the great one.
Gear
Usually, I write about gear before I get to the technique, composition, and settings. However, there is no specific gear for forced perspective. You can use any camera, with or without a tripod, any lens, and any available lighting conditions. Actually, there’s no point in thinking about gear before you choose your location and the subject. And after that, you use your common sense to add something like a tripod or extra light or some props.
Choosing the right lens for forced perspective can be tricky, though. Naturally, one would think that a wide angle lens is the best choice as it provides greater depth of field, magnifies the foreground or your subject, and diminishes the background. It seems like a perfect set up for an illusion. However, it comes with the distortion that can be distracting.
In some cases, you can use a wide angle lens, but for most opportunities, it is best to use a zoom lens. A zoom lens will allow you to change perspective, composition, and frame without moving closer or farther.
Those are some nuances, but you can use any kind of lens to create a forced perspective image.
“If you can see it, you can shoot it.”
– Ted Grant
Settings For Forced Perspective
Settings for forced perspective depend on your idea. But it all comes down to aperture settings. Most of the forced perspective images require deep depth of field. You want both the foreground and the background in focus in order to create an illusion. The best way to achieve this is to choose a small aperture between f/8 and f/16. It should provide deep enough depth of field and sharpness in your image. Smaller aperture can cause diffraction, while a larger aperture will blur the background.
Of course, you can adjust your settings depending on your shooting conditions and ideas. Sometimes you may want to get some blur. In low light conditions, you might need to bump your ISO or open your aperture wider.
Final Words
I hope you find these tips helpful. While forced perspective shots can be spectacular, they are actually pretty easy to execute. You don’t need to be a great master of photography to capture some amazing shots with forced perspective.
If you have a good idea and the right location, you just need to follow a couple of simple rules and you’ll get it right. So, keep your eyes open and carry your camera wherever you go.